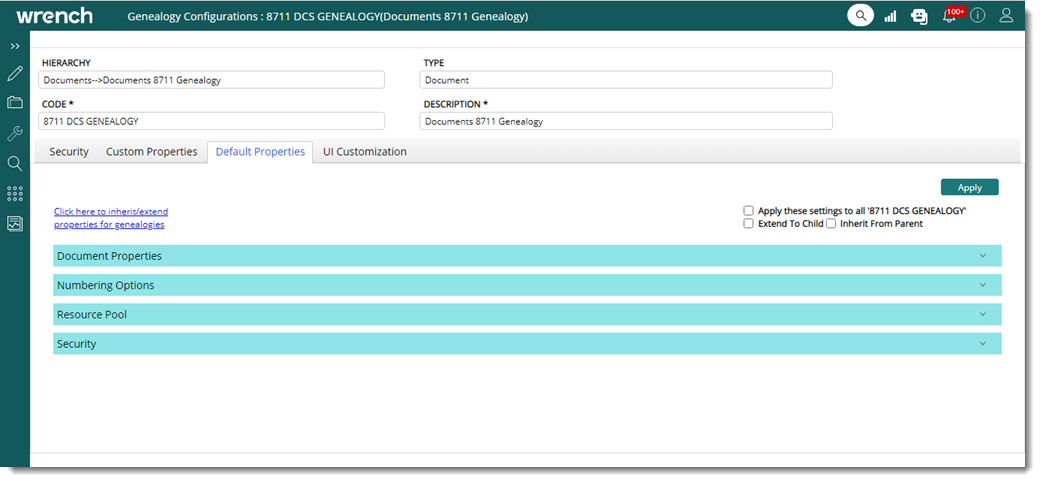
|
#
|
Property
|
Description
|
|
1
|
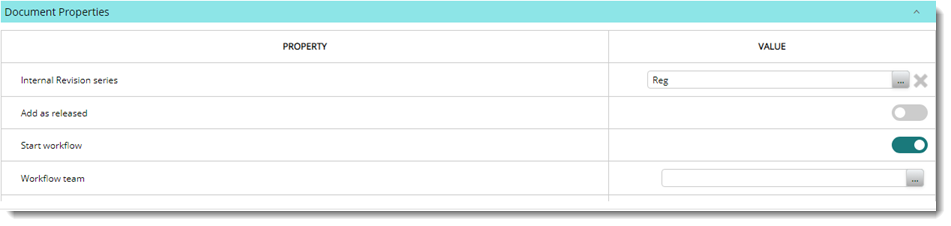
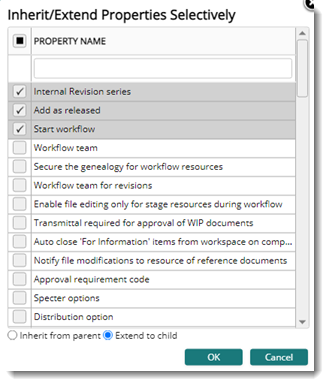
Internal Revision Series
|
The Internal Revision Series for this Document Genealogy can be selected here and set as default for this genealogy.
|
|
2
|
Add as Released
|
If this option is enabled then the non-project Documents added in this level will be in the "Released" status. The user may edit this option while adding Documents. If this setting is enabled, the Start Workflow setting is disabled automatically.
|
|
3
|
Start Workflow
|
On selecting this option the workflow for the document is started automatically on adding the document. If this options is enabled, the Add as Released option is disabled automatically.
|
|
4
|
Work Flow Team
|
A default work flow team can be set here. If the Document is project based then the resources selected for the Project are given precedence. Unguided workflow can also be selected. Option Unguided is displayed by default.
|
|
5
|
Secure the genealogy for workflow resources
|
On selecting the checkbox against “Secure the genealogy for workflow resources” the operations on the documents under this genealogy is restricted to the workflow resources.
While manually routing documents if this option is selected the following resources are permitted to view the documents.
•Current stage resources
•Users listed in the routing history i.e. users who were a part of the workflow
•Users with rights in the genealogy
User may consider the following while viewing documents.
Documents with WIP and released workflows: May be viewed by only the workflow resources.
Documents with Unguided workflow: May be viewed by the creator of the document and by the routing history resources based on their right in genealogy.
Add as Released Documents: These documents can be viewed by the creator of the document and resources with rights in that genealogy.
|
|
6
|
Workflow team for Revision
|
Browse and select a document workflow team for revise process.
Once this revision workflow is set, this workflow team will be defaulted for the revise operation for the documents of this genealogy.
|
|
7
|
Enable file editing only for stage resources during workflow
|
On selecting this option only resources in a stage will be able to edit a file available in a specific stage. File operation (Add/Edit/Remove) can be restricted or permitted based on the availability of documents in user workspace.
To restrict or enable file operation
1.Click the Configure button. Attachment Types window is displayed.
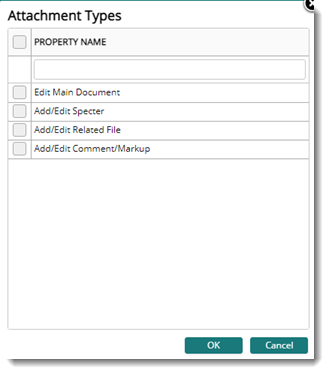
Figure: Attachment Types window
The following settings can be enabled or disabled.
•Edit Main Document
•Add/Edit Specter
•Add/Edit Related File
•Add/Edit Comment/Markup
When the setting is ON, and user who is not in the active stage try to add, replace, or remove the attachments, the operation is restricted, and a warning message is displayed. If the setting ‘Enable file editing only for stage resources during workflow’ is selected and if the current user has ‘Add/Edit Comment/Markup’ permission, user is permitted to add or edit comments in CRS only if the user is in the current active stage of the workflow. This is applicable only when, there is a workflow assigned to the document and the assigned workflow is active.
In the case of documents without a workflow or if the assigned workflow is not active, user is permitted to add or edit comments in CRS, if the current user has ‘Add/Edit Comment/Markup’ permission.
|
|
8
|
Transmittal required for approval of WIP documents
|
If the 'Transmittal required for Approval of WIP documents' setting is enabled in the Document Genealogy default properties of the selected Document, a message would be displayed to the user asking him/her whether to release the transmittal on routing or not. However, if this setting has not been checked at any place, the Document would be released without a transmittal.
|
|
9
|
Auto close ‘For Information’ items from workspace on completion of the current workflow stage
|
When sending workflows from one stage to another, ‘For Action’ recipients are assigned in ‘To’, and ‘For Information’ recipients in ‘Cc’. In some industry scenario, the items are to remain in the ‘Cc’ recipient’s workspace, even after the action resources have routed it to further stages. But in certain other scenarios, it needs to get automatically closed, so that the ‘Cc’ recipient’s workspace does not get filled. On selecting the checkbox next to this option, the document in the workspace ‘For Information’ is removed (Forced close) as soon as the current stage becomes processed/completed.
|
|
10
|
Notify file modifications to resource of reference documents
|
When the setting is selected, in addition to the users of the main document, users who have worked with referenced documents are also included in the mail generated when a file is modified.
|
|
11
|
Approval Requirement Code
|
A default Approval Requirement Code is set here for this Document genealogy.
|
|
12
|
Specter options
|
You can specify if specter files has to be attached to documents this genealogy.
|
|
13
|
Distribution Option
|
This option is primarily for specifying type of document to be send while sending the transmittals to the customer. Click the Configure button. Distribution Option window is displayed where you can select the type of documents that are to be send with the transmittal.

Figure: Distribution option selection window
|
|
14
|
Character Updation Mode
|
This option is set for Characteristics Mapping Function. The user may specify if the mapping is bi-directional or not here.
|
|
15
|
Auto attach documents to the Task
|
While adding a document to the genealogy, you can specify whether documents are to be attached automatically to the task. The options can be selected from a drop down list.
Not Enabled: On selecting this option you can just add a new document to the genealogy without linking or referring it to a task.
Link: On selecting this option, the document will be linked to the task based on Task Linking Matching option and the task genealogy specified in the Default Task Genealogy.
Refer: On selecting this option, the document will be referred to the task based on Task Linking Matching option and the task genealogy specified in the Default Task Genealogy.
|
|
16
|
Default Task Genealogy
|
You can select a genealogy under which the task has to be created. You cannot make a selection, if Auto attach documents to the Task is selected as Not Enabled.
|
|
17
|
Task Linking Matching option
|
Here you can select a mode based on which a task has to be auto generated. The options displayed in the following figure can be selected from a drop down list.
Here if you select the Reserved Client Document Number, the task name of the auto-generated task will be same as the reserved client document number.
NOTE: If there are similar custom properties defined for Document and Task, then you can also auto generate task based on these custom properties.
|
|
18
|
Origin Type
|
The default Document Origin Code can be set here.
|
|
19
|
Submission Details Mandatory
|
On selecting this option vendor details has to be entered for further processing of the document.
|
|
20
|
Approval Status Code Mapping
|
The default approval status Code for this Document genealogy is set here.
|
|
21
|
Correspondence Genealogy
|
A genealogy can be defined for correspondence Documents.
|
|
22
|
Correspondence Type
|
Type of Correspondence can be specified here. Correspondence types available are WRENCH SmartProject and Archived. If the option WRENCH SmartProject is selected correspondence management module would be enabled for the folder. If the option Archived is selected existing correspondence management function would be available.
|
|
22
|
Address for the external mails
|
User may configure an incoming mail id here, from which the mails are to be fetched.
|
|
23
|
Correspondence Reply Genealogy
|
You can define a genealogy to store replies to your entire correspondences. If a reply genealogy is specified, while replying to correspondence, reply genealogy is filled by default. If user has selected a reply genealogy it is cached and next time if the same user is trying to perform reply operation in same genealogy then reply genealogy in cache is displayed.
|
|
24
|
Reply Correspondences with original file
|
Select the check box next to this option to include the original file in the replies to a correspondence.
|
|
25
|
Delete Server Copy after Fetching Mails
|
On selecting the option, once the mails are added to WRENCH SMARTPROJECT, the copy that is present in the server is deleted.
|
|
26
|
Fetch Mails Automatically
|
On enabling this option mails in the server are fetched automatically based on the duration specified in the scheduler of the WRENCH SMARTPROJECT server. Document numbers for the fetched mails will be auto generated based on the "Project Number/Serial Number" logic.
|
|
27
|
Approval Code Mandatory in Release Stage
|
The field approval code mandatory in release stage is selected by default. If the check box against this field is selected, to route from release stage approval code is to be provided.
|
|
28
|
Project is Mandatory
|
On selecting this option, the system permits only addition of project dependent documents. While trying to add project independent documents system returns a warning message indicating this operation is restricted.
|
|
29
|
Change the revision number on Replace / Check In
|
On selecting the checkbox against this option, while revising a document revision number is incremented.
|
|
30
|
Maximum number of versions maintained
|
The version of a document changes when the document is checked out edited and saved. Old version of the document might be needed for reference or corrections. Depending on your requirement you can define the number of version of document that is to maintained in WRENCH SMARTPROJECT. Here you can enter a value for the number of versions that is to be maintained.
|
|
31
|
Ageing Days High
Ageing Days Medium
Ageing Days Low
|
This settings is applicable only for correspondence genealogy. In SmartProject correspondences can be defined as High, Low and Medium priority. Based on the priority replies are send to the mails. For a high priority mail a reply might need to be sent within X days of receipt of the mail. Similarly for medium and low priority mails number of days within which a reply is expected can be defined. This setting can be defined here. This date is based on the calendar defined for the organization.
Enter values for High, Medium and Low.
|
|
32
|
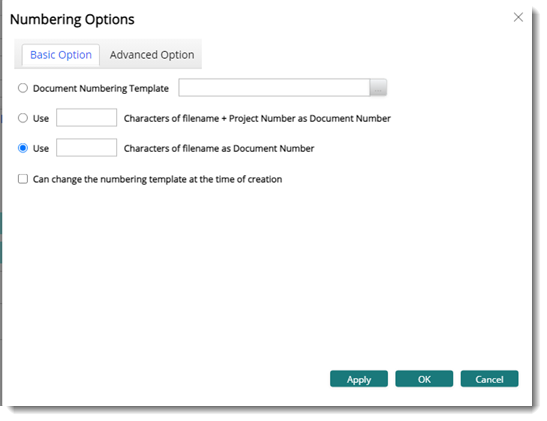
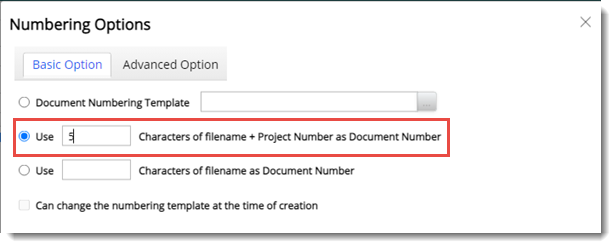
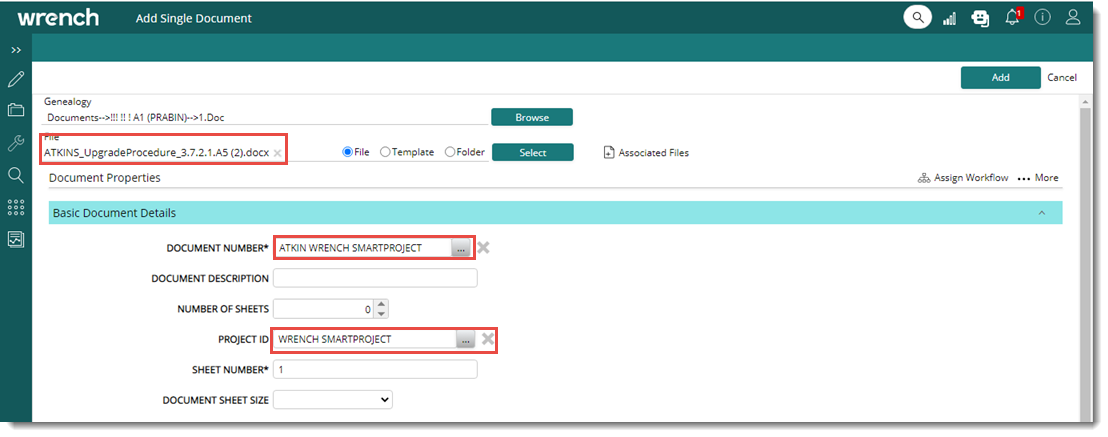
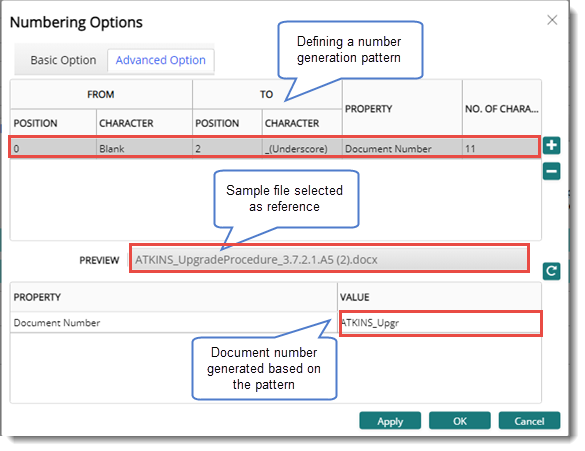
File Name Structure (Not applicable for linking enabled documents)
|
The structure of the file name for a document that has to be released with transmittal mail can be defined here. The default structure is assigned by default. You can define the following structures for the file name from a drop-down list.
On clicking the button Configure, Advanced Optionwindow is displayed.
On the window displayed two options Basic Option and Advanced Option are available.
Radio button next to Basic Option is selected by default. In the drop-down list different options will be available. Option Default is displayed by default.
1.Click the down-arrow to select a Basic Option.
The following options will be available in the drop-down list.
Document Number: On selecting this option file name will be generated based on the document number.
Document Number-User Revision Number-Sheet Number: On selecting this option file name will be generated based on this combination.
Document Number-Revision Number-Document Description: On selecting this option file name will be generated based on this combination.
Document Number-Revision Number: On selecting this option file name will be generated based on this combination.
Document Description: On selecting this option file name will be generated based on document description.
Document Description-User Revision Number-Sheet Number: On selecting this option file name will be generated based on this combination.
Based on the option selected file name is generated for the documents in the genealogy.
On clicking the Advanced Option, option to create a file name structure based on different document properties and separators is displayed.
File name structure will be generated based on the Property and Separator combination defined here.
NOTE: If file naming structure is configured for main document, the same logic will be applicable to specter file also. While downloading the specter file, file name will be renamed. If file name logic is not configured, system will download the specter file in its original file name.
|
|
33
|
Fast Track Revisable
|
On selecting this check box fast track revision can be carried out on the documents saved under this genealogy.
|
|
34
|
Default Client Comment genealogy
|
Click the browse button to select a genealogy for storing the client comments. The genealogy selected here will be the default genealogy for client comments.
|
|
35
|
Default X-ref genealogy
|
Click the browse button to select a default genealogy for storing the X-ref files.
|
|
36
|
Increment internal revision on changing revision number
|
On selecting this option, if a work in progress document is Checked Out and Checked In, or replaced internal revision number is incremented.
|
|
37
|
Assign workflow initiator as the first stage user
|
On selecting this option user who starts the workflow will be assigned as the first stage user.
|
|
38
|
Distribution List
|
Here a user can browse from the master and apply a distribution list to the selected genealogy. When creating transmittals with documents from this genealogy, it is this distribution list that is applied to the transmittal (unless a list is not mentioned in the transmittal type)
|
|
39
|
Default Reference Document Genealogy
|
Here select a genealogy to store reference document.
|
|
40
|
Correspondence Source
|
A correspondence handling mechanism can be defined for a correspondence genealogy. If the option Archived is selected correspondence is handled using the normal document addition window. If the option WRENCH SMARTPROJECT is selected a correspondence handling window is displayed and the document is handled using this.
|
|
41
|
Default Squad Check Comment genealogy
|
Here select a genealogy to store squad check comments.
|
|
42
|
Generate correspondence number on send
|
Click this option to generate a temporary number when a correspondence is saved. A correspondence number is generated only when the correspondence is send or released.
|
|
43
|
Stamping Optuions
|
Here user can select whether to stamp or sign on main document or spectre.
In the window options Ask User, Specter and Main Document are available.
If the option Ask User is selected, while stamping a selection window is displayed, where you can decide whether to insert stamp on document or spectre.
If the option Specter is selected, stamp will be inserted in the spectre file attached to the document.
If the option Main Document is selected, stamp will be inserted in the Main File.
|
|
43
|
Inherit Custom Properties to Referred document
|
On selecting this option when a single document is referred to document with document details and custom details filled in, the common custom characteristic values (in Parent Document Genealogy and Referred Document Genealogy) are automatically filled/inherited to Referred document details in Add Document window.
|
|
44
|
Footer text to be included when printing document details
|
In SmartProject there is a facility to download the document details in PDF format. While downloading header and footer details are mapped. In the drop-down list custom properties assigned to the genealogy can be selected. Once a custom property is selected, text entered for the selected custom property is displayed as footer in all the pages selected for downloading. In addition if there are any images or logo it will also be available
|
|
45
|
Correspondence mail template
|
If the correspondence type selected is WRENCH SMARTPROJECT and there are different correspondence templates defined in the masters, then a template can be selected.
To select a template
1.Click the browse button next to the field Correspondence Template.
Correspondence Mail Template window is displayed. Different templates are listed here.
1.Select a template from the list and click the Select button. Selected template will be the default WRENCH SMARTPROJECT correspondence template for the genealogy.
|
|
46
|
Send only to users in the same origin of the creator
|
If this option is enabled, documents can be send only to users who belong to the same origin of the creator of the document. If the origin is different the operation is cancelled and a warning message is displayed.
|
|
47
|
User email ID for external mail sending also
|
If this option is enabled, when a correspondence is sent, email is send from the external email id.
|
|
48
|
Inherit Reference documents to new revisions
|
If this option is enabled, reference documents attached is inherited to new revisions of the document also.
|
|
49
|
Allow fetched mails in work in progress to be seen by others.
|
If this option is selected, All the fetched mails having work in progress is accessible to users having “View Work In Progress “right in the selected genealogy and the personal folder created from this genealogy. After selecting this option if the option Fetch mails as work in progress is not selected, all the correspondence in released status will be fetched to this genealogy.
|
|
50
|
Fetch mail as work in progress
|
After selecting this option if no genealogy is selected in the project under correspondence tab, all the correspondence fetched to this genealogy will be in Work In Progress.
|
|
51
|
Physical file is mandatory for release
|
For releasing a document through a transmittal, physical file is mandatory. But for documents that does not require a transmittal for release, physical file is not mandatory for releasing the document. For completion of workflow, presence of physical file is not mandatory. Such release of documents without physical file is not desirable.
To manage this select the checkbox next to the option Physical File Mandatory for Release. This option is selected by default. Once this option is selected, when a user tries to release a document without a physical file, a warning message is displayed.
|
|
52
|
Allow revision number from out of series
|
If this option is enabled, entering revision numbers that are out of the assigned series is permitted.
|
|
53
|
Preserve original mail when fetching mails
|
This setting is enabled only when the genealogy is set as Correspondence and Correspondence Source is set as ‘WRENCH SMARTPROJECT’. By default, this setting will be unchecked.
Once this setting is enabled, a hyper link View Original Mail will be available in the draft’s correspondence. This will be available until the mail is send and once the mail is sent, this link is no more displayed. On clicking View Original Mail, the original fetched mail will be opened in a separate tab as HTML mail.
|
|
54
|
Block Duplication of Document Numbers
|
If this setting is enabled, using a document number that is already in use is restricted, even though a different sheet number combination is used.
|
|
55
|
Automatically attach latest revisions of referenced documents
|
If this setting is enabled, when a new revision is created for a document with reference document attached, the reference document is attached automatically to the new revision of the document.
|
|
56
|
Turn On Automatic specter file creation
|
If this setting is enabled, a specter file is created when a document is viewed.
|
|
57
|
Can update approval status code without release transmittal
|
If this setting is enabled, approval status code for a document can be updated, without releasing the transmittal.
|
|
58
|
Show workflow UI when adding documents
|
In most EPC scenarios, documents are created by vendors and sent through a workflow for review.
Ideally, the documents are first created in SmartProject and after multiple sessions of editing (check-in and out), when the document is ready for review, it is sent through the workflow. But usually, vendors create documents in SmartProject when the document is ready for review.
In such scenarios, sometimes after adding the documents, they forget to send them through the workflow for review -as sending through the workflow is a separate procedure. Hence the document remains in the vendor's workspace.
As a solution to this, If this option is selected, the Assign Workflow window is displayed after adding the document.
|
|
59
|
Inherit custom properties to reply correspondences
|
If this option is selected, custom properties are inherited from the document in the case of archived correspondence and correspondences in the case of Wrench Correspondence.
|