|
Custom Characteristics are additional characteristics associated with each object in SmartProject such as Documents, Tasks etc. SmartProject has a scalable characteristics management system, using which additional characteristics can be created as required, for any of these items. Such characteristics may have specific security concerns, and default values etc. Custom Characteristics addresses these requirements. A set of characteristics can be defined as a class and assigned to an object. Class is a definition of a set of characteristics. When a class is assigned to an object all the characteristics in that class will be assigned to the object.
For ease of management the Custom Characteristics master consists of the following items.
Class
Characteristics
Object-Class Link
Class-Characteristics Link
Dependencies
Creating and managing these items are explained in the following sections.
Opening Custom Characteristics Window
1.On the Masters window click Custom Characteristics.
Custom Characteristics Window is displayed.
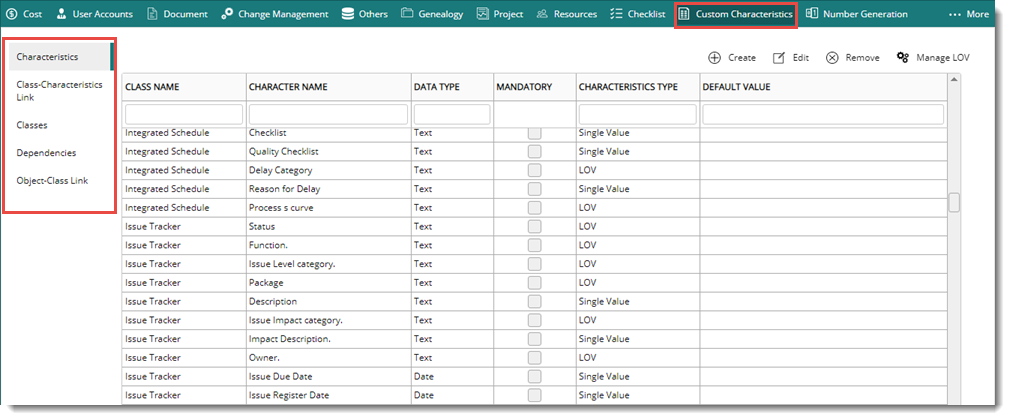
Figure: Custom Characteristics window
Different options for creating and managing custom characteristics are displayed on the left side pane. In the preceding figure, option Characteristics is selected by default. Available characteristics is displayed on the grid.
Creating and managing class
Class is a collection of a set of characteristics. Class can be used to group similar characteristics together.
To create a class
1.On the left pane of the Custom Characteristics Master window click Classes. Classes window is displayed.
2.On the window click “CREATE”.
Custom Class Master Entry window is displayed.
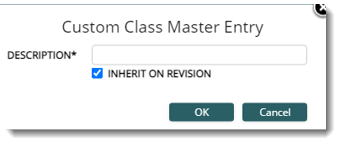
Figure: Creating a Class
3.Enter the “Description” of the Class.
If the checkbox next to the option “Inherit on Revision” is selected, then when the revision number increments, the class assigned to every document is listed in every revision of the document . Or else the characters are not listed in the revision documents.
4.Click “OK”. The Class is created.
Managing a Class
The class description can be modified, also a Class which is not in use can be removed.
To edit a class
1.On the Classes window select a class and on the toolbar click “Edit”.
Custom Class Master Entry window is displayed.
2.Edit the values.
3.Click “OK” to save the edited Class.
To remove a class
1.On the Classes window select a class that is not in use.
2.On the toolbar click “Remove”.
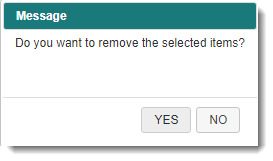
3.Click YES to remove the selected class.
If the selected class is used in any modules, the operation is restricted and the following warning message is displayed.

Creating a custom character
Additional characteristics required for handling different objects in SmartProject can be created here.
To create a Characteristic,
1.On the Custom Characteristics window, left pane, click Characteristics.
2.On the characteristics window tool bar click “CREATE”.
New Custom Character window is displayed.

Figure: New Custom Character window
3.Enter the “Character Name”.
4.Choose the desired Data Type for the Character from the drop-down list. Options available are Number, Text and Date.
5.Assign a value to the “Data Width”, the Character width should be less than or equal to the value assigned.
6.If the Data Type selected is Number a decimal point can be entered for the data width. Enter a decimal value in the field next to the property “Decimal”.
7.Enter a “Default Value”.
If check box against "Is Mandatory" if enabled, the Characteristic is mandatory.
1.Choose the desired “Character Type”, either a single value, list of values (LOV) or WRENCH. Select "LOV " if a list of values is assigned to a Characteristic. Select WRENCH, where a query can be provided and based on the query, the query can be validated, and the value will be fetched from back end.
2.Click “OK”, the Character is created successfully.
Managing a character
Value of characteristics can be edited, and characteristics that are not assigned to any object can be deleted.
To edit a character
1.On the Characteristics window select a Character.
2.On the toolbar click Edit.
New Custom Character window is displayed with the values assigned to the selected charcater.
Only values of the properties CHARACTER NAME, DATA WIDTH and DECIMAL can be edited.
3.After editing the values click OK to save the changes.
To remove a character
1.Select the character that is to be removed.
2.On the toolbar click Remove. A warning message is displayed.

3.Click YES to remove the selected character.
If the selected character is assigned to any object the operation is cancelled and a alert message is displayed.

Managing LOV (List of Values)
List of values are the different values that can be selected for a characteristic. This is applicable only for Characteristics of LOV type. List of Values can be assigned to a characteristic.
To manage LOV's
1.Select the characteristic of type LOV that is assigned to a class.
2.On the tool bar click Manage LOV.
Manage LOV window is displayed. Here you can add list of values for the selected characteristics, update existing values or delete list of values assigned to the characteristics. You can also assign the list of values to projects.
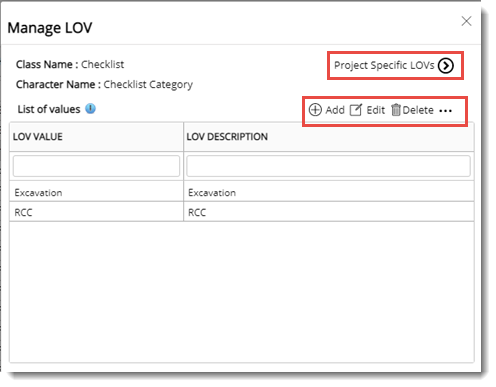
Figure: Manage LOV window
To add a LOV
1.On the window place the mouse pointer over the option Add. A menu is displayed.
2.On the menu click New. Top part of the Manage LOV window expands
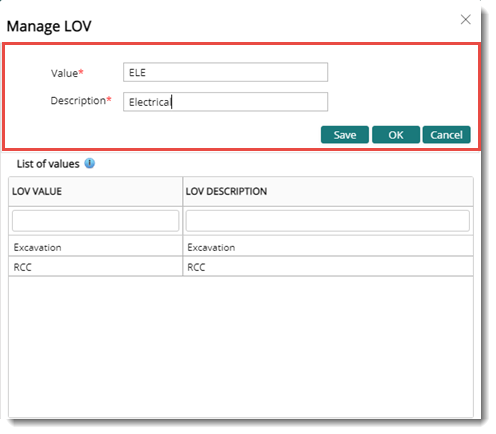
Figure: Adding an LOV
3.Enter the new Value and a Description.
4.Click Save to add the LOV to the list. The value is successfully added to the existing list.
Options to edit a value and remove a value is also available on the window.
Assigning list of values to a Project
List of values can be assigned to a Project, so that each project will have its own set of LOV for a custom property. You can assign a Project ID against each LOV value. List of Values assigned to a different project can be imported to another Project.
To assign list of values to a Project
1.On the Manage LOV window click Project Specific LOV's.
2.On the window displayed click the browse button next to Project ID.
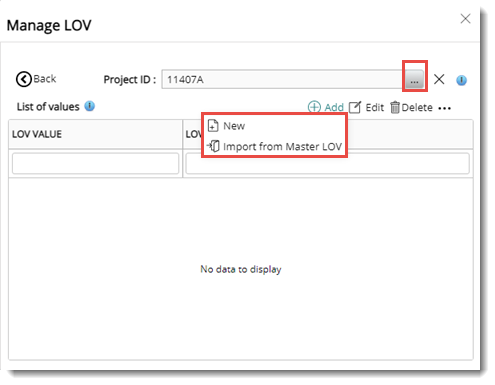
Figure: Selecting a Project
3.Project Search window is displayed. In the Project Search window select a project.
If there are any LOV's assigned to the selected project, it is displayed in the grid; or else the grid would be blank.
1.Place the mouse pointer over the option Add. A pop-up menu is displayed.
2.On the menu click New.
3.Enter a Value and Description and click Save. A new LOV is added to the Project.
To import from Master LOV
1.On the menu click Import from Master LOV.
Master List of Values window is displayed. Here the LOV's assigned to characteristics is displayed.
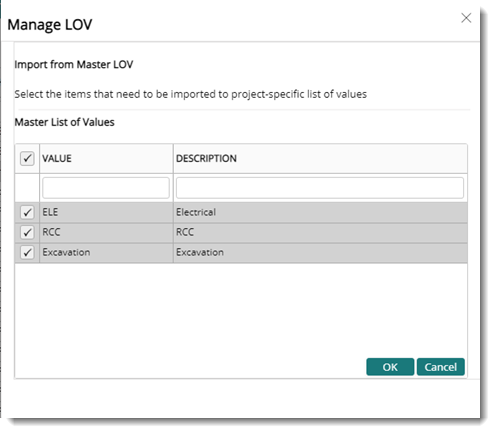
Figure: Importing Master List of Values
2.Select the checkbox next to the values that are to assigned to the Project.
3.Click OK. Selected values are added to the Project.
Importing of LOV's in bulk
List of Values can be imported in bulk using an MS Excel template. An import template is generated, values are entered in the template and values are imported to the system.
To generate an import template
1.On the Manage LOV window, place the mouse pointer over the more options.
2.On the menu displayed click Generate Template.
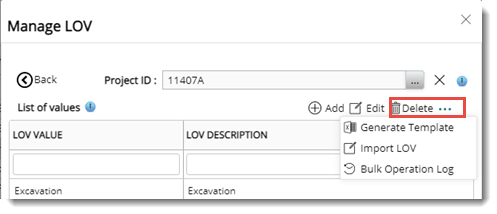
Figure: Generating a template
3.An excel template is generated. Enter the values in the template and save the template.
.png)
To import values
1.On the menu click Import LOV.
2.File Selection window is displayed. Select the excel file from the stored location.
The values are imported.
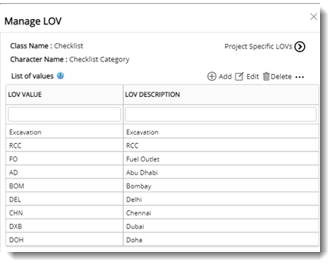
Figure: Imported Values
To view a log of import operation
1.On the menu click Bulk Operation Log.
Bulk Operation Log window is displayed. Here a list of operations and status of the operation is displayed.
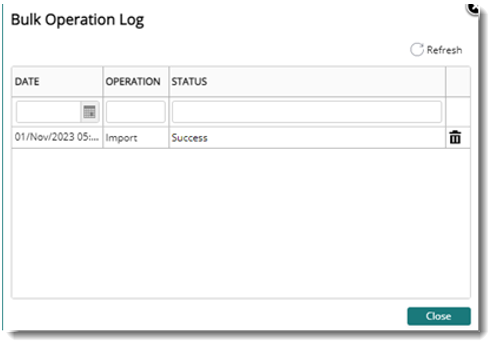
Figure: Bulk Operations Log
|