A Project is created from the Project Details window.
Pre-requisites
A user can be assigned appropriate security rights to Create/Edit/View/Delete projects by selecting Project module and assigning User or User group based Security Rights for the same. This operation is carried out at the server side.
It is usually a Project manager with appropriate rights in the Project module that creates a Project.
If any mandatory custom characteristics are linked to the Project; only those users with Security Rights to View/Edit the data will be able to complete the creation of the project. The rights may be assigned in the Characteristics Security module. For more information see section Control Panel>>Performance and Utilities>>Custom Characteristics in Administrator's manual.
Creating the Project
In the project details area the basic information related to the project can be provided. For easier identification of their projects a unique project identification number based on a numbering logic is necessary for an organization undertaking multiple projects simultaneously, A description of what the project is and a short description of the project for internal references are specified. Usually project description is the clients description of the project and short description is the description provided by the company for internal references. The client for the project is also specified. The client is the organization which awarded the project to the company. A project manager is defined for this particular project from a list of resources. Only those users belonging to project managers group can be added as a project manager. A project manager can also have other roles in the project. Project start date is the day on which the project has started and the day on which the project should end is the project end date. All the fields marked with an asterisk (*) are mandatory for the successful creation of a project.
The option to create a project is available in the top right corner of the Project Details window.
 To create a project
- In the project details window click Create.
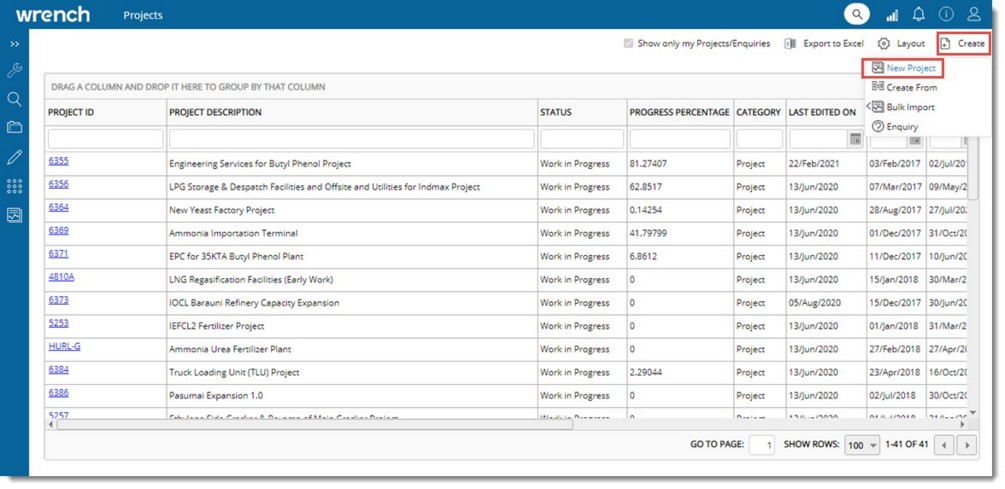
Figure: Creating a project
- In the ensuing menu click New Project.
Create Project window is displayed.
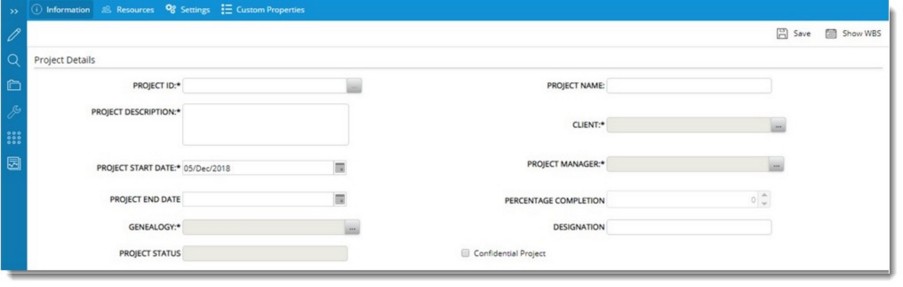
Figure: Project Creation window
NOTE: For creating a project the basic project details mentioned in the following table are to be specified. Additional project details are specified after a project is created.
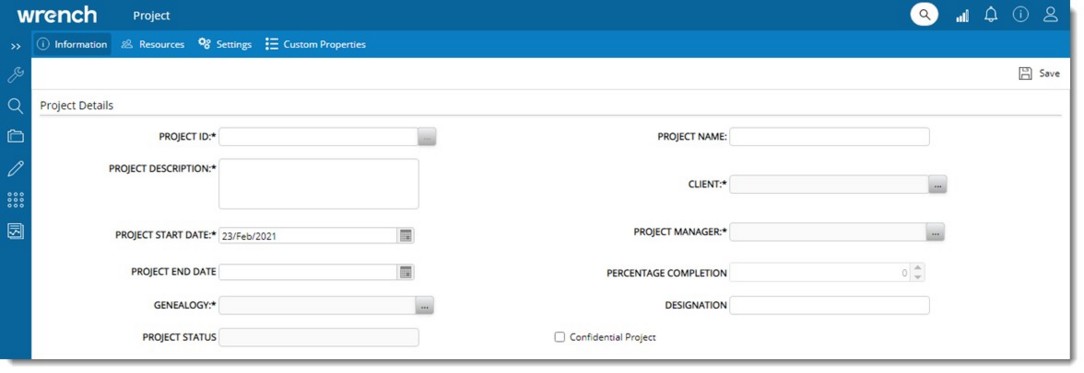
Figure: Entering project basic details
|
#
|
Property
|
Description
|
|
1
|
Project ID
|
Enter the unique code using which a Project is identified. Project number can be entered manually or auto generated.
In certain projects the Project ID for the projects is given only after an approval is received but before that they start the work in WRENCH with a temporary Project ID. Hence a facility to edit Project ID is available. For users with Edit Project right, in the Project Details window a cross mark will be displayed next to the Project ID. On clicking this the Project ID will be cleared.
|
|
2
|
Project Description
|
Enter a description for the project. This is for the purpose of identification.
|
|
3
|
Project Name
|
Enter a short name for the Project
|
|
4
|
Project Start Date
|
Enter the start date for the project.
|
|
5
|
Project End Date
|
Enter the end date for the project.
|
|
6
|
Project Genealogy
|
Select the folder in which you want to save this project. Click the browse button to select a genealogy. If a genealogy is defined in the Project Genealogy default properties, it is displayed here. When the genealogy of the project is changed, the values of custom properties of those classes which are common between the old and new genealogies are retained.
|
|
7
|
Client
|
Enter the customer or client for this project. Click the browse button to select the client or customer from a pre-defined list.
|
|
8
|
Project Manager
|
Enter the project manager selected for this project. Click the browse button to select a project manager from a list of users.
|
|
9
|
Percentage Completion
|
The Project completed percentage will be displayed here. The total percentage, i.e. sum of percentages calculated from all the summary tasks of the WBS (from the Percentage Completion based on work flow field) will be displayed in this field.
If a WBS is not available for the project then the percentage completion field on the project module can be manually updated by a user with appropriate rights in the module. Project will be completed on providing a value of 100 in the percentage completion field.
|
|
10
|
Designation
|
Specify the designation of Project Manager in the Company.
|
|
11
|
Project Status
|
Current status of the project. This can be created, work in progress or completed.
|
|
12
|
Confidential Project
|
If the checkbox next to this option is selected, resources who are not a member of the project cannot view the documents added to the project. However the document will be listed in a search operation, but non-project resources cannot open and view the document.
|
- After entering the values for the fields next step is to assign project resources.
NOTE: Once a project is created the Project Creator and the Project Manager is automatically assigned as resources in the project and is listed in the Resources tab of the project.
Assigning Resources
After entering the project details project resources has to be assigned.
To assign project resources
- In Project window click Resources tab.

Figure: Assigning Resources
- Click Add User to assign resources to the Project.
On clicking Add User, Search User window is displayed.
- In the Search User Window, select the users and click OK.
- Selected users are displayed in the window.
After assigning resources different settings can be defined for the project from Project Settings tab. For more information on this see Creating a Project>>Project Settings.
- After entering the necessary project details click Save to create the project.
A Project is created with the properties you have provided.
The following options are displayed in the Project Properties window tool bar.
Cost Details: On clicking this option Cost Details corresponding to the Project is displayed.
Show WBS: On clicking this option WBS corresponding to the Project is displayed.
Show RBS: On clicking the option Risk Breakdown Structure corresponding to the Project is displayed.
Show Tender: On clicking this option Tenders related to the Project is displayed.
Show BOQ: On clicking this option bill of quantities related to the Project is displayed.
When the project is saved different properties that defines a project and behaviour of deliverables linked to the project are grouped under different tabs.
These details are arranged under the following tabs.
Information
Resources
Settings
Systems
Type Master
Status Codes
Documents
Notes
Area
Rule of Credit
Reference
Issue Purpose
Custom Properties
Correspondence
Templates
CRS Mapping
Workflow
Different types of operations can be carried out from the Project Details window. These operations are detailed in section Project Operations.

