|
Document details window is the centralized location from where almost entire document related operations can be carried out. Comprehensive information on the properties assigned to the documents are available here. Wrench ensures that the document details window contains entire information about a specific document.
Document details window can be opened by clicking the document number that appears as a hyperlink.
Document Details window
The document details window comprises of the following.
1.An Options bar at the top.
2.A customizable tab strip where different operations is displayed as buttons.
3.A grid that displays information on the document and attachment.
4.Sections that displays different document properties.
5.A menu that assists in switching between different sections or panes in the window.
6.Arrow button to move between different sections or panes.
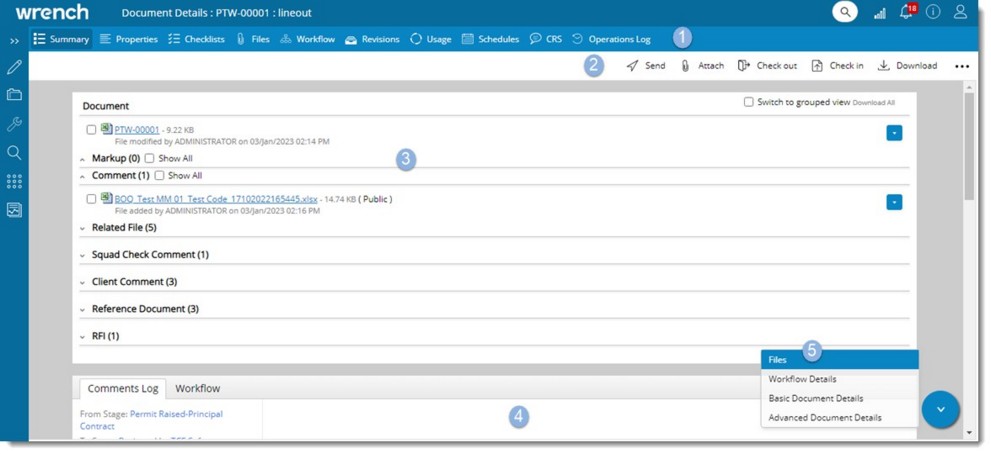
Figure: Document Details window
The Options bar is further divided into the following sections.
Summary
Properties
Checklists
Files
Workflow
Revisions
Usage
Schedules
CRS
Operations Log
Operations from tab strip
On the tab strip of the document details window, different document related operations are displayed as tabs. These tabs can be added or removed from the tab strip. Only five operations can be displayed in the tab strip at a time. The remaining operations are displayed under More icon.
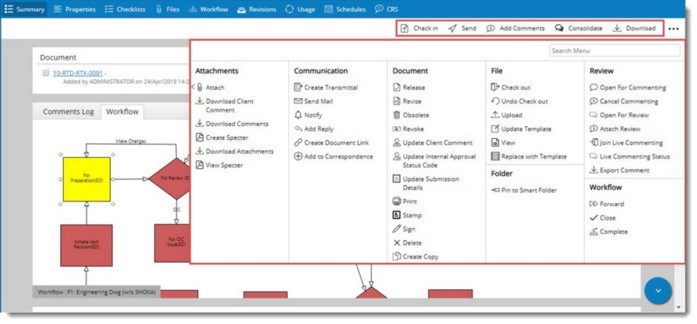
Figure: Operations from document details window
Different operations that can be carried from the document details window are explained in the following section.
Send
This option is used to send documents to next stage after completing the work. You can send a document using a guided workflow or an unguided workflow. For more information on sending documents refer Sending Documents through a workflow.
Check Out
Entire documents managed by WRENCH are stored on a central server. When files have to be taken from WRENCH into the local machine for editing, it has to be checked out. On checking out, the file is locked by the user for editing. The checked out document is opened in the native application and user can make the necessary changes to the document. A checked out document is indicated by a red tick mark.
To check out a document
1.Click Check Out.
Check Out window is displayed.
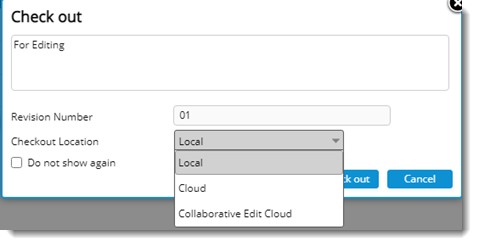
Figure: Check Out window
2.Enter Remarks
3.Select a checkout location. By default the option displayed is Local.
4.Select the checkout location as Cloud if the document will be edited online.
5.Click Check Out to continue. If the option selected is Local, a message The document has been successfully checked out is displayed.
6.Click OK to continue.
If the checkout location selected is Cloud, the cloud storage location is authenticated as per the configurations in SmartProject, and the document is copied to the specified location using the original file name. If the file is an MS Office file, the file is opened in the corresponding MS Office application. The file can be edited online. Or else the file location where it is checked out is displayed.
If the checkout location selected is Collaborative Edit Cloud, the document is checked out for collaborative editing. For more information on collaborative editing, see Sharing files for collaborative editing.
NOTE: When the document is checked out for the first time after transmittal release an option to select revision number is enabled and you can select a revision number. For more information Refer Project Settings>>Allow document revision number duplication.
Do not show again: Certain users do not provide any remarks while checking out and are aware of the revision number of the document that is being checked out or revision number is not relevant to the user. For such users there is no need of the check-out window. To handle such situations option Do not show again is available.
After selecting the checkbox next to this option, on clicking Check Out, the following warning message is displayed.
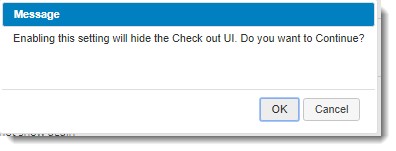
Click OK to continue the operation. Click Cancel to abort the operation.
Once this setting is enabled, the system will not display the check out window whenever a Check out operation is carried out. The success message on checking out a document will be displayed.
To check out multiple documents
1.On the workspace select multiple documents.
2.Click Check Out.
Selected documents are compressed to a zip file and downloaded. Open the zip file, and extract the files.
To check in multiple documents
1.On the workspace select the files and click Check In.
File selection window is displayed.
2.Select the edited files from the folder and click Open.
Document successfully checked in message is displayed.
Check In
Check In is the reverse operation of Check Out. It is the process of sending a document back to the server after editing. The Check In button is enabled on the menu only if the selected document is checked out. A red tick mark indicates whether the selected document is checked out. On checking in a document the version number is incremented.
To check in a document
1.Click the option Check In.
Check In window is displayed.
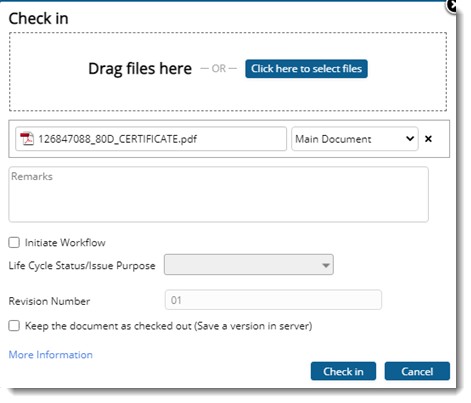
Figure: Check In window
2.Click the button Click here to select files to choose the file to check in.
3.The document you are checking in can be added as a Main Document, Specter or Related file. Select the file type from a drop-down list.
Initiate Workflow: If the check next to this option is selected, when the user check in or upload a document assigned with a workflow, and completes the procedure of sending notification, Send window is displayed. If the user check in or upload a document without workflow, assign workflow window is displayed.
Keep the document as checked out (Save a version in server): If the check box next to this option is selected, the changes you made to the document will be visible to other users, but the document will still be in the check out status and the option "Initiate Workflow" is disabled.
4.Click Check In to continue.
On successful check in Notification window is displayed.

Figure: Notification window
TO field will be filled automatically with the users who has worked on the document by default. Users in the To field can be modified. The Subject field will be filled by default as Document <<Document number>> is modified. Subject field can also be modified.
On selecting the checkbox next to the option “Do not show this message” this window will not be displayed unless the cache is cleared.
On clicking Notify, mail will be sent to the email ID of the users in recipients list. Notification Sent Successfully message is displayed.
Undo Check Out
After checking out a document and editing it, you may need to cancel the changes made. You can use "Undo Checkout" option to cancel the changes made after checking out a document. The edited file is removed and the file on the server will be retained so that the original remains without any changes.
Upload
Instead of checking out the document, editing it and checking in the document; the document can be replaced with the latest document. While replacing an open or read only document the system returns a message asking for the confirmation of the operation. On confirmation the document is replaced with the uploaded last saved version of the document.
To upload a document
1.Click Upload.
Upload window is displayed.
2.On the file Upload window, files for upload can be selected by clicking on ‘Click here to select files’ or by dragging and dropping files into the Upload window file drop area.
3.Select a specter file that will be attached along with the replace file.
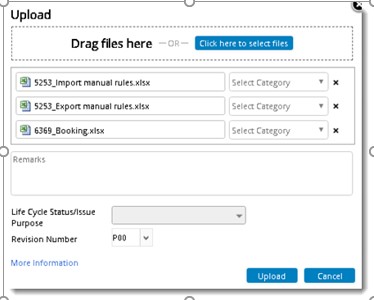
Figure: Upload window
4.Option to select category of the file will be available next to the file. Category can be selected from a drop-down list.
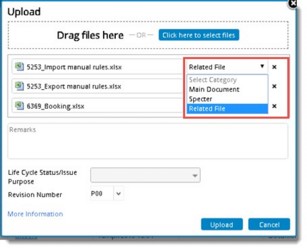
Figure: Selecting file category
5.Click Upload to continue with the replace process.
On successful upload a notification window is displayed.
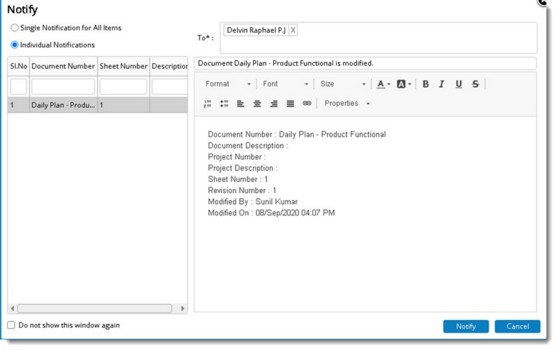
Figure: Notification window
TO field will be filled automatically with the users who has worked on the document by default. Users in the To field can be modified. The Subject field will be filled by default as Document <<Document number>> is modified. Subject field can also be modified.
On clicking Notify, mail will be sent to the email ID of the users in recipients list. Notification Sent Successfully message is displayed.
On checking “Do not show this message” this window will not be displayed unless the cache is cleared.
On the Clear Cache window, a new item Send Mail on Document Modification is available.
More Information: Click the hyperlink More Information to view additional details like current Version of the document, Internal Revision Number.
A document can also be replaced by dragging a document to the drop zone in the smart folder grid. Here you can select a file Upload option.
To upload a document by dragging to drop zone
1.Select the smart folder where the document that has to be replaced is located.
2.Drag the document to smart folder pressing down the left mouse key and when the drop zone is displayed, release the mouse key.
A message box is displayed.
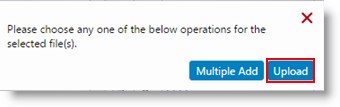
3.On the message box click Upload to replace the file in the selected smart folder.
Bulk Upload window is displayed.
If the File Name (name of the file in the local drive) and the existing Document file name matches, in the Bulk Upload window status column, the status is displayed as Match found.
For Example: If the file name of the document in the local drive is ABC.txt, for fulfilling the matching option, the file name of the document in Wrench has to be ABC.txt.
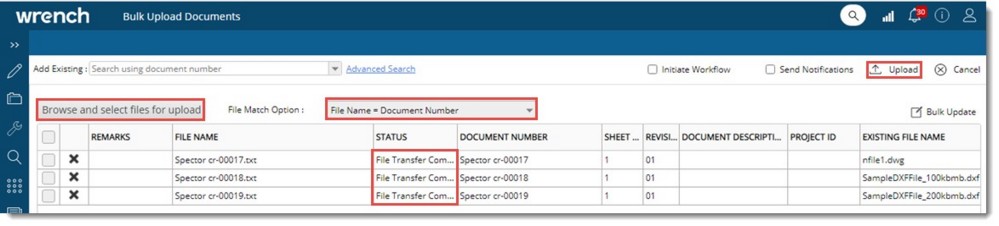
Figure: Replacing the document
4.Click Upload button to replace the file.
Initiate Workflow: If the check next to this option is selected, when the user uploads a document assigned with a workflow, and completes the procedure of sending notification, the Send window is displayed. If the user upload a document without a workflow, the assign workflow window is displayed.
NOTE: The file matching option by default would be File Name=Document File Name. You can select different options from a drop-down list. If any other options from File Matching Options are selected for replacing, the selected option would be saved in the cache as the default option. If you want to select files for replacing from the Bulk Upload Documents window, click Browse and select files for replace.
Different file matching options available in the drop-down list are as follows.
•File Name = Document File Name
•File Name = Document Number
•File Name = Client Document Number
•File Name = Vendor Document Number
In case matching documents are not found, user can select a document manually by clicking the browse button in the column DOCUMENT NUMBER.

Figure: Selecting documents manually
1.Click the browse button to select a document for replacement.
On clicking the browse button. Advanced Search window is displayed.
2.Search for the documents.
3.On the Search Results grid choose the document and On the tool bar click Apply Selected.
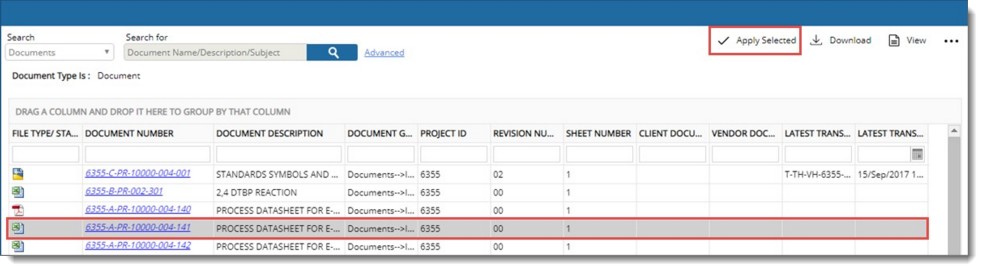
Figure: Selecting documents
Selected document will be displayed in the grid. Different columns in the grid will get filled with document properties.
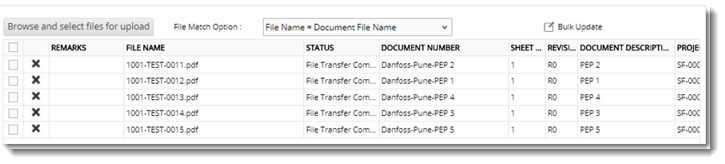
Figure: Documents displayed in the grid
1.Click Upload to replace the document.
Selected document can be cleared by clicking the cross button as shown in the following figure.
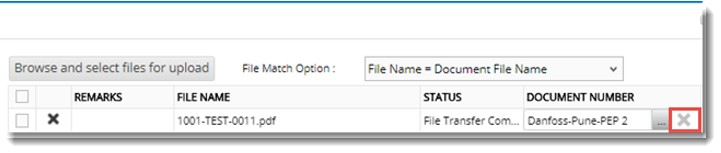
Figure: Clearing the selected document
In case multiple matches are found, click the browse button to select a document from matched documents. On clicking the browse button Matched Documents window is displayed.
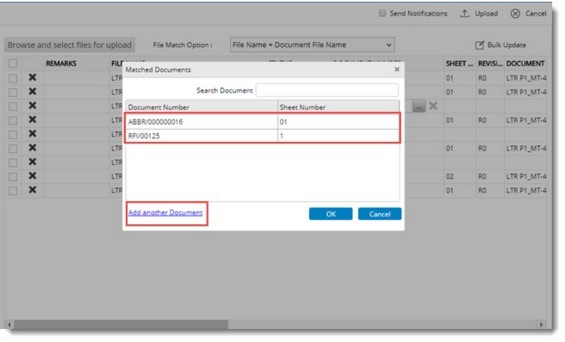
Figure: Matched Documents window
There is an option available in the Matched Documents window to add another document.
1.Click the hyperlink Add another Document.
Advanced Search window is displayed. Here you can carry out a search operation and select the required document.
Bulk Upload
Instead of replacing a single document, a set of documents can be replaced together using the Bulk Upload option.
To bulk upload documents
1.Select multiple documents from the smart folder.
2.On the tab strip click More>>Upload.
Bulk Upload Documents window is displayed.
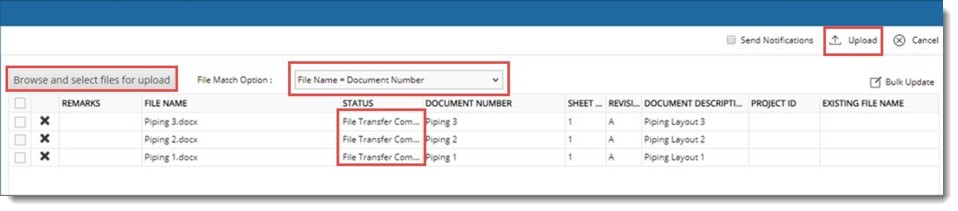
Figure: Bulk Upload of documents
3.The matching option selected is File Name = Document Number.
4.Click the button Browse and select files for upload.
5.If the File Name (name of the files in the local drive) and Document Number of files in Wrench match, in the Bulk Replace window status column, the status is displayed as File Transfer Completed.
6.Once files are selected for replacing, in the Bulk Update Documents window, click Upload button.
NOTE: It is possible to update or edit Revision Number and Life Cycle Status from this window. Click Update to upload these values. On selecting the checkbox next to Send Notifications, notification mails are sent to all users who have accessed the files that were replaced. In the bulk upload window, when a revision number that is not the immediate next revision number is selected for a document, a warning message is displayed as a tool tip.
The files are uploaded successfully.
On the bulk update window after selecting the documents to upload and successfully uploading the documents, the following message is displayed.
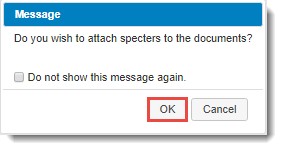
1.Click OK. Bulk Attach Specters window is displayed.
Here you an attach specter files in bulk.
Forward
With this option you can notify users about the status of a document. In addition a user who is not a part of the workflow would be able to access the object which is being sent through a workflow. Thus you can send an item to a user who is not in the workflow stage for additional comments or help.
To forward a document
1.On the document details window click Forward.
Forward window is displayed.
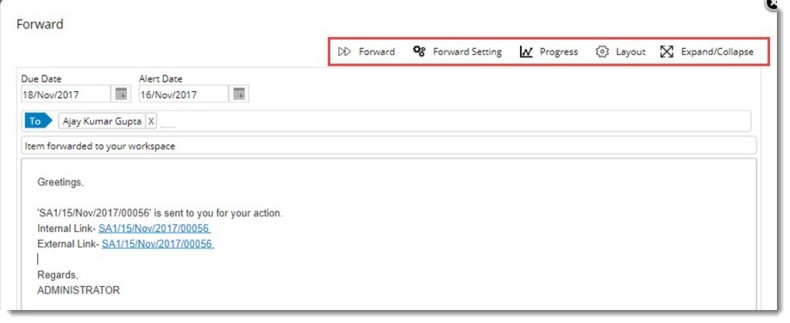
Figure: Forward window
2.Click To button to select the recipients for the document.
3.Select an End Date and Alert Date from a date picker. Due date is a date that specifies when the activity would be due. Alert date is a date on which the recipient has to be alerted.
4.Click Forward to forward the document or task to the selected users for information.
NOTE: You can forward single and multiple objects using this option.
Forward Settings: You can specify who among the mentioned recipients can forward the task/document information to other users.
To define forward settings
1.On the Forward window click Forward Settings.
Can Forward window is displayed.
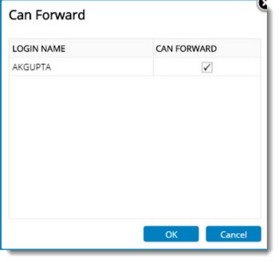
Figure: Can Forward window
2.Select the check box next to a user to specify that the user can forward the information to others.
3.Click OK to save selection.
The selected users will be able to forward the received task or document to another user.
Close
Select this option to close the work in your workspace. The work will be open in the workspace of other user until they act upon it.
Complete
Select this option to complete a document if it has gone through all workflow stages. User in the last stage of the workflow can complete the document using this option.
To complete a document
1. On the Document details window click Complete.
Complete window is displayed.
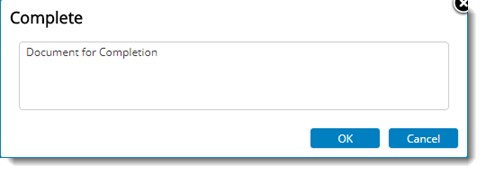
Figure: Complete window
2.Enter your remarks or comments and click OK to continue.
Reassign User
Using this option you can remove users from workflow stages and assign a new user to workflow stages.
To reassign users to a workflow stage
1.On the document details window tab strip click Workflow.
The workflow assigned to the document is displayed.
2.Select the stage where you want to re-assign workflow resources.
3.On the options menu click Reassign.
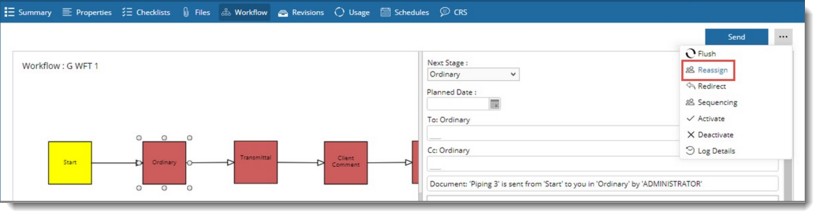
Figure: Reassigning Resources
4.Click the user icon to remove or add resources.
5.Search User window is displayed. Here you can add additional resources or remove existing resources.
6.After re-assigning resources click Save to store changes.
The stage resources are reassigned successfully.
Create Transmittal
Reply to correspondences can now be sent to relevant stake holders through a transmittal. For ease of sending the reply through a transmittal ‘Create transmittal' option is available in document details window.
1.On selecting this option Transmittal Type window is displayed.
You can select the transmittal type and the document transmittal window is displayed.
2.Here you can enter values for the fields in the window.
For more information on creating transmittals refer Creating a Transmittal.
Create Specter
On clicking this option a request to create specter file is posted to the server. Once the specter file is generated it is attached to the main document.
View Specter
On clicking this option after selecting a document, specter file is downloaded. In case there are more than one spectre attached to the document attachment tab in the document details is opened and latest revision, latest version of spectre is displayed.
Send Mail
While working with some documents in Wrench, it might be required to send documents by outlook mail to others for verification, review or approval. Send Mail option can be used to accomplish this.
The Send Mail option in the navigation bar assists the user in sending external mails from Wrench with the selected documents as attachments in the mail. Documents and document attachments can be send using this option.
To send mails
1.Click the option Send Mail.
Send Mail window is displayed.
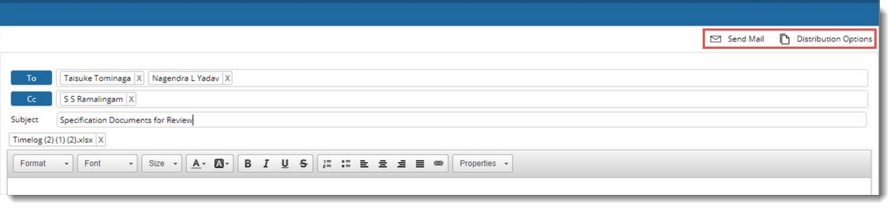
Figure: Send Mail window
2.Enter the mail recipients.
3.Enter a subject and content for the mail.
4.Click Distribution Options to add attachments to your mail.
Attachment selection window is displayed.
5.Select the check box next to the attachment type.
Selected attachment type is displayed in the mail window. When the mail is send the selected attachment types are sent along with the mail.
6.Click Send Mail to send the mail.
Notify
Notify operation is used to send a message to a user. The content of the message will be related to a document in most cases. The user who sends the message can provide more clarity to the messages by inserting the document/Task meta data values.
To send a notification
1.Click Notify.
Notification window is displayed.
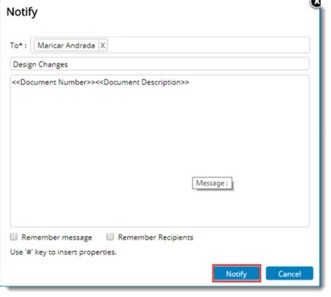
Figure: Entering values in notification window
2.On the To: field enter the recipients for the notification.
3.Enter a subject for the notification.
4.Enter a notification message. Here a notification can be inserted using the # sign. When you type # sign a list of document properties are listed. Select a document property from the list.
5.You can also enter the # sign followed by a character. Document properties starting with that character is displayed. This helps in quick selection of document properties.
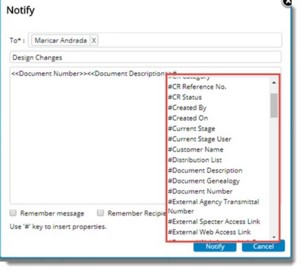
Figure: Inserting document properties
6.Click Notify button to send the notification.
Delete
You can permanently remove the document from Wrench using the delete option. This helps in removing redundant documents and thus saving disk space.
Release
Select this option to release a completed document. When a document is added without physical file and a user tries to release the document, an alert “Document without physical file cannot be released” is displayed.
Replicate
A replication request for the selected document can be raised using this option.
To raise a replication request
1.Click Replicate
Replicate window is displayed with a list of servers.
2.Select the check box next to the server to which the document has to be replicated.
3.Click Replicate to start the replication process.
Pin to smart folder
Using this option you can pin the documents to Smart Folder. The pinned document will be available in the selected smart folder irrespective of the rules based on which the smart folder is created. It is also possible to unpin documents from the smart folder.
Print
Click this option to print the selected document. On clicking this option Print window is displayed. Enter different print settings and click Print button.
Update
Different document properties can be updated from here. On clicking Update a pop-menu containing the following options are displayed.
Client Comments: Usually the client marks their comment on the document and sends it back. This comment file is updated into Wrench along with approval status code details, received back date and other details.
To update client comments
1.Click Update>>Client Comment.
Update Client Comment window is displayed.
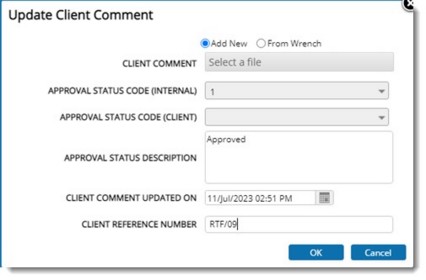
Figure: Updating Client Comment
Option to select comment file from SmartProject or from a location in your system is available. Select the respective radio button to select a comment file from your preferred location.
Select a File: Click this field to choose the comment file, if the radio button next to Add New is selected. File selection window is displayed. Select the client comment from the location where it is stored.
If the radio button next to From Wrench is selected, you can type in the client comment file number saved in WRENCH. As you type in a list of files with matching characters is displayed. Select the file from the list or enter the file name.

Figure: Selecting client comments stored in WRENCH
Approval Status Code (Internal): Select an approval status code from the drop-down list where a pre-defined list of codes will be available.
Fields Approval Status Code (Client) and Approval Status Description is filled in based on the internal status code selected.
Client Comment Updated On: This is the date on which the document was received after client comments. By default current date is displayed. Select the date from a date picker.
Client Reference Number: Enter the client reference number.
Revision Required: Define whether revision is required. Select Yes or No from a drop-down list.
2.Click OK to store changes.
Internal Approval Status Code: Approval status code defines customer's response on a document that has been sent for customer approval. For Example: If a document is rejected by customer, the document will have to be revised as per suggestion and the overall percentage of progress (in creating the document) will drop considerably as it needs a lot of rework. The approval status codes are applied to each customer (in customer master). Every Client follow unique Approval Status Codes. To accommodate this Wrench saves the various Approval Codes with corresponding internal codes.
To update approval status codes
1.Click Update>> Internal Approval Status Code.
Update Internal Approval Status code window is displayed.
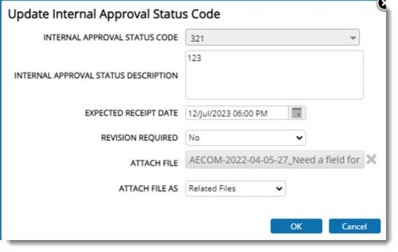
Figure: Updating internal approval codes
2.Select Internal Approval Status Code from a drop-down list.
The description corresponding to the selected code is filled in.
3.Select the receipt date from a date picker.
4.Define whether revision is required. Select Yes or No from a drop-down list.
5.Select an attachment type. Click OK.
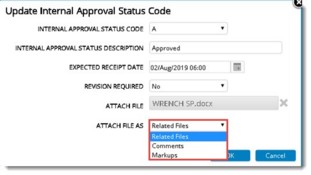
Figure: Selecting an attachment type
Internal Status Code Updated Successfully message is displayed.
Updating approval status code in bulk: Internal Status Code can be updated after selecting multiple documents. In projects where Vendors and Contractors are involved, when Internal Approval Status Code (IASC) is updated against documents, usually any review comments about the documents are also attached to the respective documents. Facility to carry out these two operations (updating IASC and attaching comments) together will help user perform the document review faster and easier.
To update internal status code in bulk
1.Select multiple documents and in the menu click Update Internal Approval Status Code.
Update Internal Approval Status Code window is displayed. Documents for which approval status code is to be updated will be selected by default.
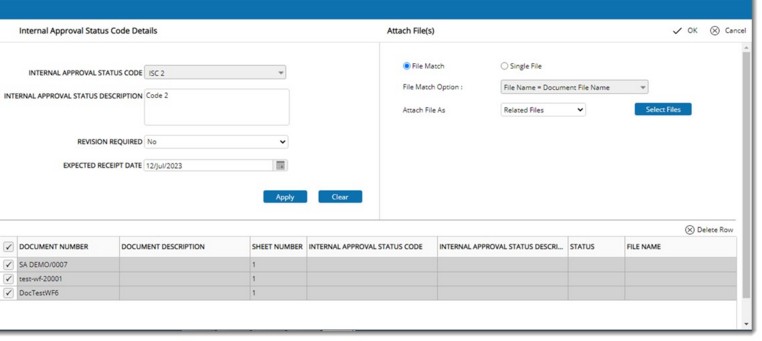
Figure: Update Internal Approval Status Code window
Update Internal Approval Status Code window is split into two panes; Internal Approval Status Code Details area and Attach File(s) area.
On the Internal Approval Status Code Details window enter the following fields.
•INTERNAL APPROVAL STATUS CODE: Select a value from the drop-down list.
•INTERNAL APPROVAL STATUS DESCRIPTION: The value is filled in on selecting internal approval status code.
•REVISION REQUIRED: Select Yes or No from a drop-don list.
•EXPECTED RECEIPT DATE: Select a date from the date picker.
2.After entering the values click Apply.
Approval status code values are updated.
Option to attach files will be available in right pane.
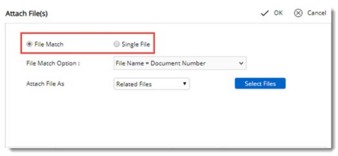
Figure: Attach File(s) window
On the Attach File(s) pane, two options File Match and Single File will be available. These options can be selected by clicking the radio button. Radio button next to File Match is selected by default. If this option is selected, File Match Option will be available. A file matching option can be selected from a drop-down list.
The selected files can be attached as Related Files, Markups or Comments. This can be selected from the drop-down list next to Attach File As.
1.Click Select Files to select the attachment.
File selection window is displayed. Select the matching files.
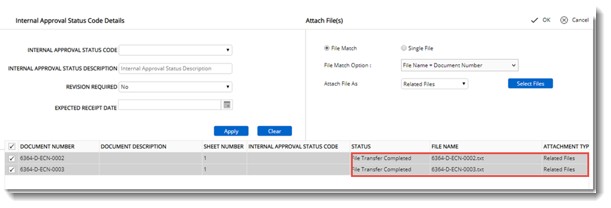
File Name of the selected files, Status and Attachment Type is displayed in the grid.
NOTE: If the file transfer is completed successfully, STATUS is displayed as File Transfer Completed, or else status is displayed as No Match Found.
In some scenarios when comments of multiple documents are made in a single file, it is required to attach the same file to all the selected documents If only a single file is to be attached select the option Single File.
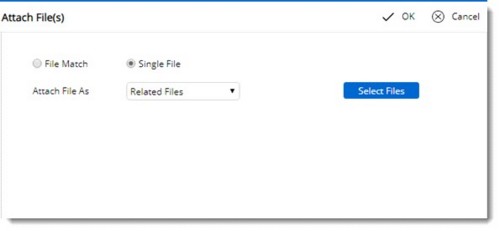
Figure: Attaching a single file
1.After selecting an attachment type from the drop-down list, click Select Files.
File Selection window is displayed.
2.Select the file that is to be attached. Attached files are displayed in the grid.
Approval Status Code details can be updated from the grid also.
To update approval status code from grid
1.Select the Internal Approval Status Code from a drop-down list.
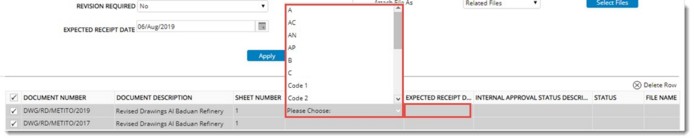
Figure: Updating Internal Status Code in bulk
2.Select the Receive back date from the date picker.
3.Click OK to continue.
To update approval status code for previous revision of document
1.Open the document details of the document.
2.Select the Revisions tab.
3.Select the previous revision for which status code is to be updated.
4.Open the document details of the selected document.
5.Click Edit and then update the Approval Status Code.
Submission Details: Documents are sent by vendors to the contractor through transmittals. For the purpose of identification these transmittals have a unique number. On receipt of these transmittals, document controller updates the transmittal number and transmittal receipt date into Wrench. These details are used for future reference and communications.
To update submission details
1.Click Update>>Submission Details.
Update Submission window is displayed.
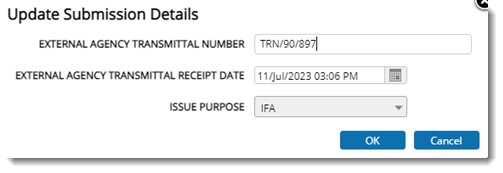
Figure: Updating Submission window
2.Enter the transmittal number of the external agency. External agency could be the client, vendor etc.
3.Enter the date on which the transmittal was received.
4.Select the purpose of issue from a drop-down list.
5.Click OK to continue.
Attach
Different types of associated files can be added as attachments to the selected file.
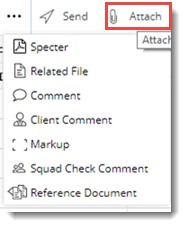
Figure: Adding Attachments
To add attachments
1.On the menu click Attach.
2.On the ensuing menu click the attachment type.
The following types of associated files can be attached to a document.
Specter
Related Files
Comment
Client Comment
Markup
Squad Check Comment
Reference Document
For more information on adding attachments to a file refer Document Details>>Attachments.
Comments can be attached after selecting multiple documents also.
To attach comments in bulk
1.On the grid select multiple documents.
2.On the options menu click Attach and select an attachment type.
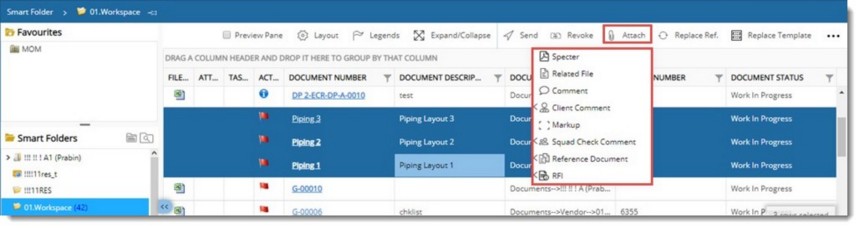
Based on the type of attachment selected, bulk attachment window is displayed.
3.When the option Specter is selected the following window is displayed.
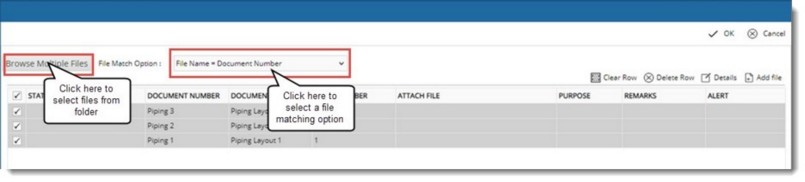
4.Select a File Match option.
5.Click Browse Multiple Files to select the files from a folder.
If files in the folder matches the match option, they are fetched automatically.
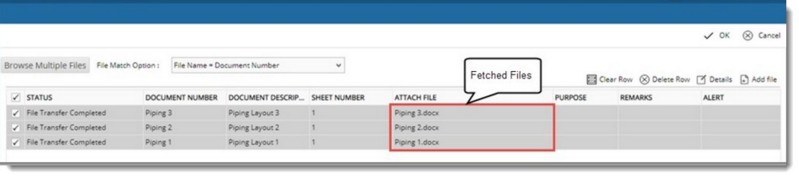
Fetched files are displayed in the grid and the status is displayed as File Transfer Completed.
6.Click OK to continue.
NOTE: In the case of Specter, Related Files and Comments, Advanced Options is available as a file matching option. Files are fetched based on Advanced File Matching option defined in the Project.
Add Reply
Using this option you can add a reply to a correspondence document. In case a genealogy is mapped to the correspondence type, the reply is added to this genealogy. Or else reply is added to the genealogy under which the parent correspondence is saved.
To add a reply
1.Click Add Reply.
Document Addition window is displayed.
2.Enter values for fields in the document addition window. For more information on working with document addition window refer Adding a Single Document.
The reply is added to correspondence genealogy defined.
Open for Commenting
This option is for opening the main file or specter attachment and commenting on it.
To open a file for commenting
1.Click the smart folder in which the document is stored.
List of documents is displayed.
2.Select the document that you want to open for commenting and double-click.
Document Details window is displayed.
3.On the tab strip click More and in the pop-up menu click Open for Commenting.
Once you click this option system checks for an auto attached specter file. If the file exists it is opened for commenting. If auto attached specter file is not present, system checks whether the main document is PDF. If so, the file is opened for commenting. If the main document is not a PDF file, system searches for manually attached specter files. If manually attached specter file is found it is opened for commenting. If multiple file exist the following window is displayed.
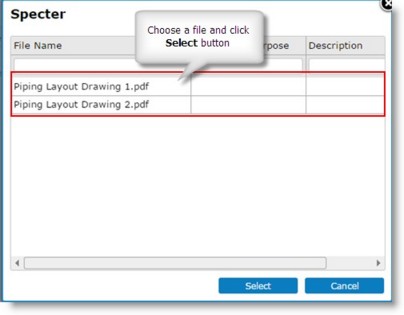
Figure: Opening documents for commenting
1.Select the document that you want to open for commenting and click Open.
2.On the document enter your comments and save the document.
Attach Comments
This option is for attaching comment file stored in the local system to the server. Comments can be attached from the Attachments tab in the document details window and smart folder.
To attach comments
1.Select the document to which you want to attach comment.
2.Click Attach Comments.
Comment dialog box is displayed.
3.Click the field Click Here to Select files.
4.Open File window is displayed. Select the comment file from the location where it is saved.
5.Select a Type.
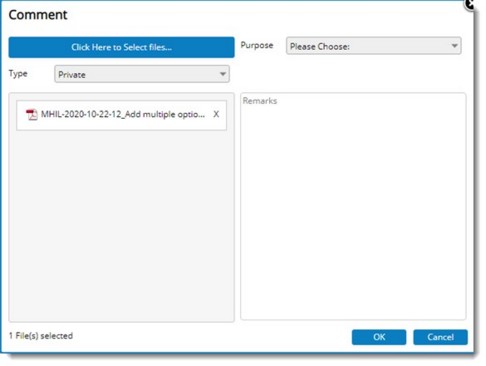
Figure: Attaching Comments
5.Enter the purpose of attaching the document in the Purpose of attachment field.
6.You can also select the purpose of attaching the document from a drop-down list.
7.Click the down arrow next to Purpose of attachment to choose a purpose from the drop-down list.
8.Enter your Remarks. This is not mandatory.
9.Click OK to continue.
Your comment file is attached successfully.
Consolidate Comments
Comments entered by different reviewers in the attachment have to be consolidated to one single comment file. Consolidate Comments option helps you in carrying out comment consolidation.
To consolidate comment file
1.Click Consolidate Comment.
Consolidate Comment window is displayed. Here details of comment files attached by different reviewers are displayed.
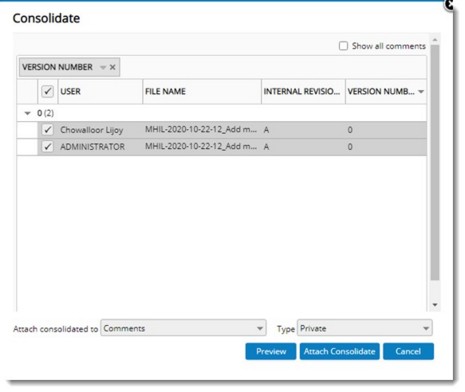
Figure: Consolidate Comment File window
2.Select the check box next to the files that has to be included for consolidating.
3.Click Preview to view the consolidated file.
4.Click Attach Consolidate to attach the consolidated comment file to the document.
5.Click the Cancel button if you want to discard the consolidation operation.
If the operation is successful the following message is displayed.
6.Click OK to continue.
A single consolidated comment file is created as shown in the following figure. This file will contain comments marked by different users consolidated to a single file.
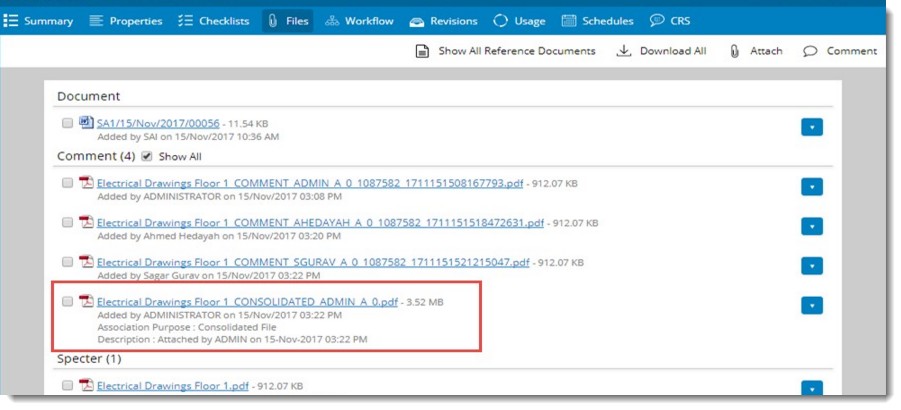
Figure: Consolidated comment file creation
Attaching consolidated files to other attachment types: When multiple stakeholder's are using WRENCH SmartProject, consolidated comment file attached by a user will be visible only to users of the same origin. The consolidated comments of the stakeholder will not be available to other stakeholder unless the consolidated comments are added under other tabs like client comments, related items etc. Hence a facility to attach consolidated comments to other tabs like Related Files, Client Comments etc. is provided so that users of different origins will be able to access the consolidated comment file.
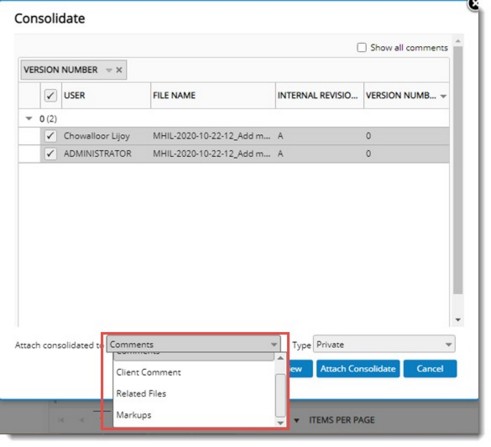
On the drop-down list options Comments, Client Comment, Related Files and Markups will be available. Option Comments will be selected by default. The option once selected will be cached and made available for that user next time.
When attaching consolidated comments in locations other than Client Comments, association purpose will be Consolidated file automatically. When consolidated comments is attached in the tab Client Comments, consolidated comment is added as a new WRENCH document.
Live Commenting Status
On clicking this option, Bluebeam Sessions window is displayed.
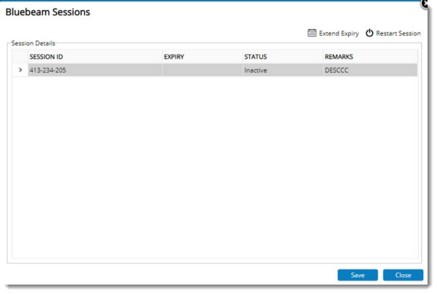
Figure: Bluebeam Sessions window
Details regarding the session will be displayed in the window.
1.Click Extend Expiry to restart and extend the bluebeam session.
2.Click Restart session to restart the commenting session.
Restart Bluebeam Session window is displayed.
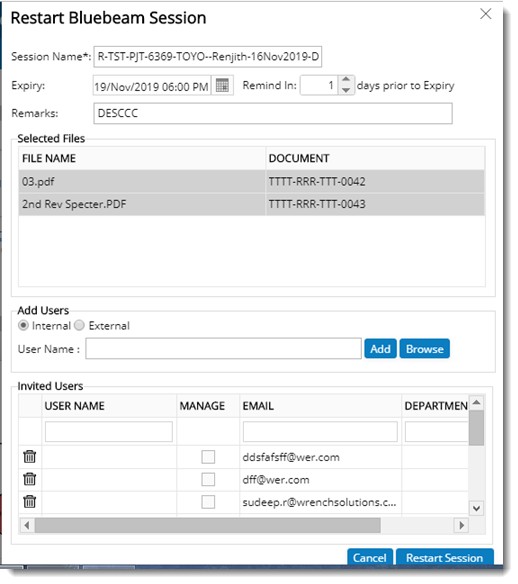
Figure: Restart Bluebeam Session window
3.On the window modify values for different properties and click Restart Session. Session Restarted Successfully message is displayed.
Open for Review
Consolidated Comment file can be opened for review from Attachments tab in the document details window and from the smart folders menu.
To open for review
1.Click Open for Review.
The consolidated file is opened for Review.
NOTE: The file opened for review will have the tag CONSOLIDATED_REVIEWED for the purpose of identifying the review file.
2.After reviewing the consolidated comment file, the file is saved.
Attach Review
The saved review file can be attached to the document.
To attach review file
1.Click Attach Review.
Comment dialog box is displayed.
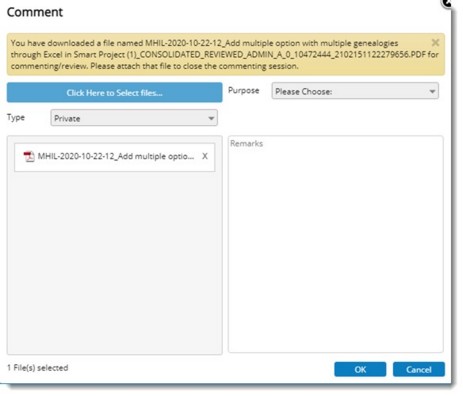
Figure: Reviewing consolidated file
2.Click Select a File, to choose the reviewed consolidated file.
3.Enter the review purpose or select the review purpose from a drop-down list that would contain a list of pre-defined review purposes.
4.Click OK to continue.
Comment files, consolidated comment files and reviewed consolidated file would be listed under the comments section in the attachments tab.
Download Comments
Click this option to download comments attached to a document. On selecting this option Download Comments window is displayed. In the window list of comment files attached are displayed. Select the comment files you want to download and click OK to continue with the download process.
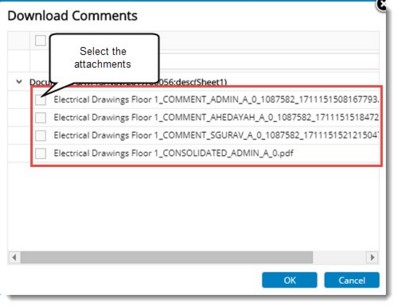
Figure: Downloading comments
Download attachments
Different attachments types attached to a document or drawing can be viewed and downloaded from a separate window.
To download attachments
1.On the smartfolder grid select the document.
2.Click Download Attachments.
Document Attachments window is displayed.
On the Download Attachments window the following are available.
Show latest revision: If the radio button next to this option is selected, attachments of only the latest revision of the document is displayed.
Show all revision: If the radio button next to this option is selected, attachments of all revisions of the document are displayed.
Show latest version: If the radio button next to this option is selected, attachments of latest version of the document are displayed.
Show all version: If the radio button next to this option is selected, attachments of all versions of the document are displayed.
Based on the option selected, documents for download are displayed.
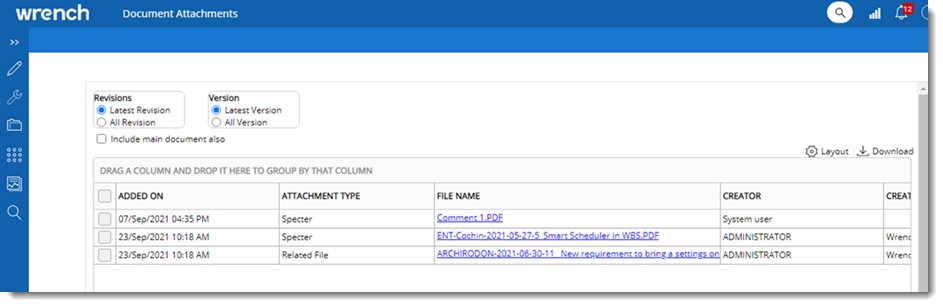
Figure: Downloading attachments
3.On the window select the attachments you want to download.
4.Click Download button.
The selected documents is downloaded.
To download multiple attachments
1.On the smart folder grid select multiple documents with attachments.
2.On the list of options click Download Attachments. Document Attachments window is displayed with a list of attachments added to different documents.
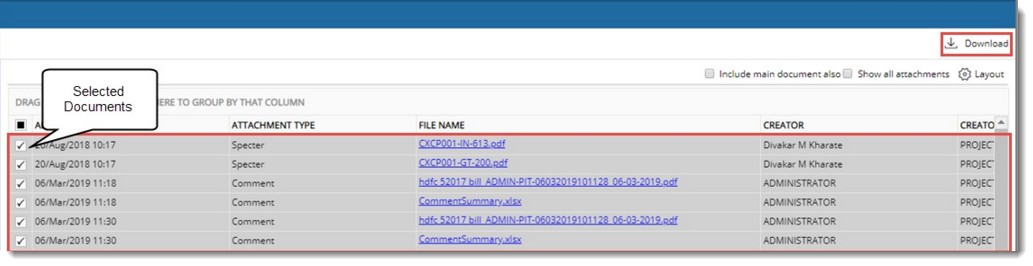
3.Select the checkbox next to attachments that you want to download and click Download.
Attachments are downloaded.
Stamp
Documents with a specter attached to it can be opened and a pre-defined digital stamp can be inserted. Stamp is inserted on the specter file. Specter file for stamping is opened in SmartProject Document Viewer. For more information on stamping see Signing and stamping documents online.
Sign
Using this option a pre-defined signature can be inserted in the document.
NOTE: A signature has to be configured in the User Master, Advanced details for a user.
For more information on signing see Signing and stamping documents online.
Print
Click this option to print the document details.
View
When you select a document and click the option View, selected document is opened in its native application. This option is functional only when an additional tool is installed.
Join Live Commenting
Click this option to join a live commenting session. For more information on joining a live commenting session refer Managing Live Commenting Sessions.
Live Commenting Status
Click this option to view the live commenting status. On clicking this option Bluebeam Sessions window is displayed.

Figure: Bluebeam Sessions window
On the window sessions that are currently live are displayed. Following options are available in the window.
Extend Expiry: After selecting a session on clicking this option date picker is displayed. You can select a future date and extend the expiry date of the session.
Restart Session: Click this option to restart an inactive session.
Replace with template
There are scenarios where the user gets the document link from the mail and wants to replace with template from the document details.
To replace with template
1.On the document details window click Replace with Template.
Select Template window is displayed.
2.From the list of templates, select a template and click OK. Template updated successfully message is displayed.
Download with QR Code
On clicking this option, document (main document/specter) is downloaded with QR in the predefined location specified in sheet master. System will verify whether the main document is pdf or not, if yes main file will be downloaded with QR code. After downloading file with QR code inserted at the pre-defined location, document can be scanned using mobile application. On successful scanning if the document is in the latest version details page is displayed. If the version of the document is old, an alert message is displayed.
If a QR code is not define for a sheet size, on clicking this option a warning message is displayed and the operation is discontinued.
Convert to Searchable PDF
Scanned documents can be converted to searchable PDFs from the search results window, smart folder, and from document details window.
To convert to searchable PDF format
1.Open the document details window.
2.On the tool bar click the option Convert to Searchable PDF.
If OCR Space is configured and the user has the rights to manage specter files in the genealogy, the request for conversion is processed as per schedule and when completed successfully, the resulting PDF file is attached as default specter. A notification is sent to the user indicating the status of conversion to PDF.
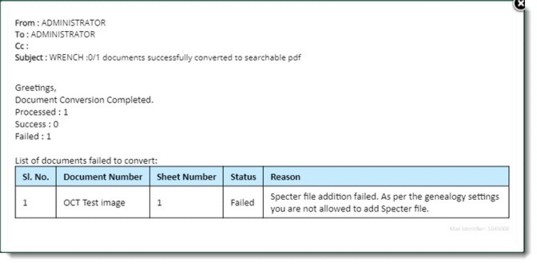
Figure: Notification window
If a default language is selected in the OCR configuration window and the setting ‘Don’t prompt for Language Selection’ is selected, the language selection window is not displayed. Or else the window is displayed. On the window, the list of languages supported in OCR Space is displayed. The default language selected in the configuration is highlighted.
|